Frequently Asked Questions

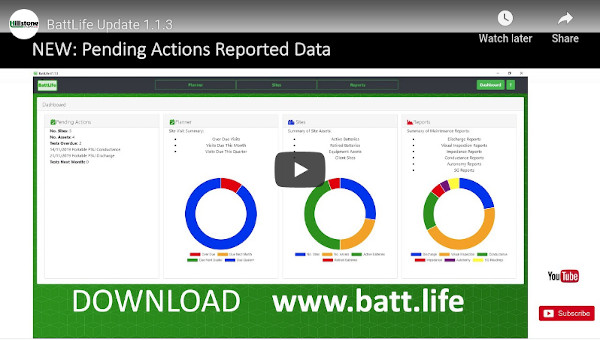
Dashboard now includes Pending actions to highlight the upcoming site events.
Additional Battery Types Now Include;
- Valve Regulated Lead Acid
- Thin Plate Pure Lead
- Vented Lead
- Ni-Cad
- Lithium
New Report Features: Age of Battery
- Simplifies Battery Maintenance Reporting
- Delivers Comparative Historical Analysis
- State of Health ( SOH )
- State of Charge ( SOC )
- End of Life Predictions
- Vendor Neutral Battery Maintenance Software
- Log Visual Inspections - NERC
- Log Impedance & Conductance results
- SG Readings
- Discharge Capacity & Autonomy Testing
- Site Manager : Manage UPS & Battery Assets
- Planner : Planned Maintenance
- Reporter : Retrieve Reports in PDF
- Data Storage of V, I, A/Hr, oC
- Protects CAPEX Battery Investment
- Increases Efficiency of Battery Maintenance
- Forecast planning of CAPEX budgets
Every battery installation will be at a Site location and Site Manager uses BattLife interactive table view to display the battery information.
Selection of a table record displays the address and contact site details.
Every Site contains standby power assests and batteries. The asset manager allows the data for each power assest and battery to be recorded against the site record.
Under the assest manager you can:
- Add a new asset
- Edit an asset
- Retire an asset for service
- Start a test
- Review historical data for the asset
- Select "Sites" from the bottom navigation bar.
- Click the "+New Site" button on the Site Details card.
- Enter the required information into the editable text fields.
- Once all the required information is entered press the "Save button. The information entered will be saved to the database and the screen will return to the Site List Display.
- Pressing the "Back" button will cancel any entered information and return the screen to the Site Lists Display.
- To display information on a site, select “Sites” from the bottom navigation bar.
- Select the site from the Site Selection table. The table can be filtered using the search bar or sorted by clicking on the table headers.
- When the site is selected the table row will be highlighted in grey and the sites information will be displayed in the Site Details card.
- Select Sites from the bottom navigation bar.
- Select the site from the Site Selection table. The table can be filtered using the search bar or sorted by clicking on the table headers.
- Click the “Edit Site” button.
- Make the required adjustments into the editable text fields.
- Once all the required adjustments are made press the “Save” button. The information entered will be updated in the database and the screen will return to the Site List display.
- Pressing the “Back” button will cancel any entered information and return the screen to the Site Lists display.
View Site Asset List shows all the battery sets on the selected site.
+New Asset allows a new asset to be added to the site.
View Assett Details allows all the details of the asset to be viewed on screen.
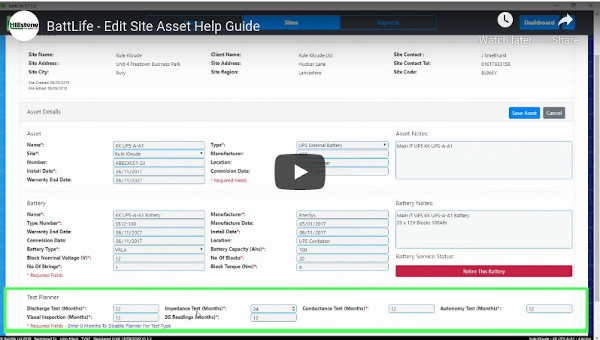
Edit Asset allows the asset details to be changed such as the Test Planner time period and the battery to be retired when it reaches end of life.
- Select the site to which the new asset is to be assigned, as per the “Displaying Site Information” section.
- Click the “View Asset List” button. This will display the Site Asset List for the selected site.
- Click on the “+New Asset” button.
- Enter the required information into the editable text fields on the Asset Details card.
-
On the Test Planner card enter in the frequency on which
each test type is to be periodically conducted.
- The initial test due date for the asset will be shown in the Planner as the X months from the date that the asset was created in the database.
- Once a test has been conducted on the asset the Planner will be updated with a next test date of test date + X months.
- The frequency is entered in months. Entering a frequency of 0 months will disable the test type from appearing in the Planner. See the section on Planner for more information.
- Once all the required information is entered press the “Save” button. The information entered will be saved to the database and the screen will return to the Site Asset List display.
- Pressing the “Cancel” button will cancel any entered information and return the screen to the Site Asset List display.
- Pressing the “Back” button will cancel any entered information and return the screen to the Site Lists display.
- Select the site to which the asset is assigned, as per the “Displaying Site Information” section.
- Click the “View Asset List” button. This will display the Site Asset List for the selected site.
- Select the asset from the Site Asset List table. The table can be filtered using the search bar or sorted by clicking on the table headers.
- When the asset is selected the table row will be highlighted in grey and a summary of the asset’s maintenance visits will be displayed in the Site Asset Visits History card.
- Click on the “View Assets Details” button. This will display the Asset Information display which will provide the Site Information, The Asset Information and the Historical Test Information. The Asset details can be viewed in full by clicking the “+Show Full Details” button. This will show the full asset and battery details for the selected asset.
- Pressing the “Back” button will cancel any entered information and return the screen to the Site Lists display.
- Select the site to which the asset is assigned, as per the “Displaying Site Information” section.
- Click the “View Asset List” button. This will display the Site Asset List for the selected site.
- Select the asset from the Site Asset List table. The table can be filtered using the search bar or sorted by clicking on the table headers.
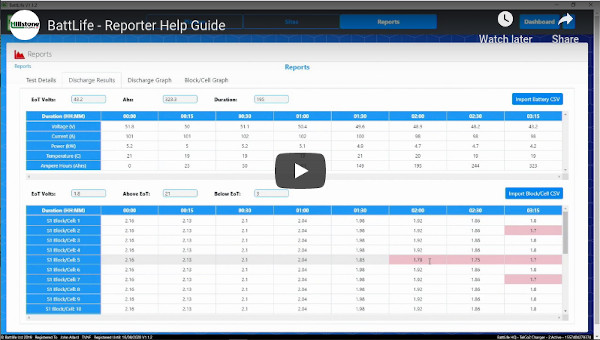
Report Manager allows the retrieval of saved site visit reports from the displayed list in the interactive BattLife table The selected report can be exported to PDF.
The test report for a visit can be exported to a PDF file by clicking the "PDF Report" button from either the Report Test Selection table or the Asset Test Selection.
BattLife has been designed with a navigation system which allows the user to move across the system via menu bar selection.
The BattLife Interactive table displays in columns field types that can be sorted in ascending or descending order.

Planner gives the Engineer a Battery Maintenance work flow to complete a site visit for all the Assets stored on BattLife. The work flow is displayed in a list format showing the next 60 Test Visits.
Each displayed column type can be sorted in ascending or descending order allowing a fully interactive presentation of the Battery Maintenance workflow.
Selection of any record in the table will detail the planned date of the next discharge test or visual inspection and enables the Test Setup button.
A new visit can be started either from the Planner Test Selection table or the Asset Test Selection by clicking the "Visit Setup" button.
- Select the Test to be conducted on the visit by selecting the relevant check boxes.
- Complete any test parameters required for the test type / asset.
- Click the "Confirm" button to save the visit configuration and load the test forms for each test type.
Once all the test visit parameters have been completed and confirmed BattLife creates a test visit file for the Asset and test to be conducted.
BattLife automatically saves all test results. Tests can be edited after the visit is complete if required by clicking the "Edit Results" button from either Report Test Selection table or the Asset Test Selection.
Results can be imported from a Comma Separated Value (CSV) file by clicking the Import CSV button above any results table. The CSV file may need to be edited prior to import to ensure the relevant data is in the file an that the CSV file has a uniform column length.
- Click the "Import CSV" button above the table in which you want to import data. The "Import CSV File" screen will be shown.
- Click the "Select CSV File" button to load the required file. The selected file will now load into the "Import CSV File" table and additional option will now become available.
- Adjust the "Data Start Row" input so that the header rows are removed and only that required data remains in the table.
- Select the separator from the "Data Separator" input which matches the separator used in you CSV file. The data table will now split in to the required number of columns and each column will have a data type selector on the first row.
- "N/A" -Not Applicable - To be used to remove a column from the import. (Single Column)
- "Time (HH:MM:SS)" - To be used on a column where the value is a time stamp. (Single Column)
- "Date Time (DD/MM/YYYY HH:MM:SS)" - To be used on a column where the value is a datetime stamp. (Single Column)
- "Duration (HH:MM:SS)" - To be used on a column where the value is a duration in elapsed hours, minutes and seconds. (Single Column)
- "Duration (Mins)" - To be used on a column where the value is a duration in elapsed minutes. (Single Column)
- "Voltage (V)"- To be used on all voltage values except Discharge Block/Cell values. (Single Column)
- "Discharge Block/Cell (V)" - To be used on all voltage values for Discharge Block/Cell values. (Multiple Columns For each Block/Cell value)
- "Current (A)" - To be used on all current values when required. (Single Column)
- "Power (kW)"- To be used on all power values when required. (Single Column)
- "Temperature (C)" - To be used on all temperature values when required. (Single Column)
- "Ampere Hours (Ahrs)" - To be used on all ampere hour values when required. (Single Column)
- "SG Reading (g/cm3)" - To be used on all specific gravity values when required. (Single Column)
- "Impedance (mOhms)" - To be used on all impedance values when required. (Single Column)
- "Conductance (S)" - To be used on all conductance values when required. (Single Column)
-
"Discharge Battery Table"
- Time and / or Duration (required)
- "Voltage (V)" (optional)
- "Current (A)" (optional)
- "Power (kW)" (optional)
- "Temperature (C)" (optional)
- "Ampere Hours (Ahrs)" (optional)
-
"Discharge Block/Cell Table"
- Time and / or Duration (required)
- "Discharge Block/Cell (V)" (required)
-
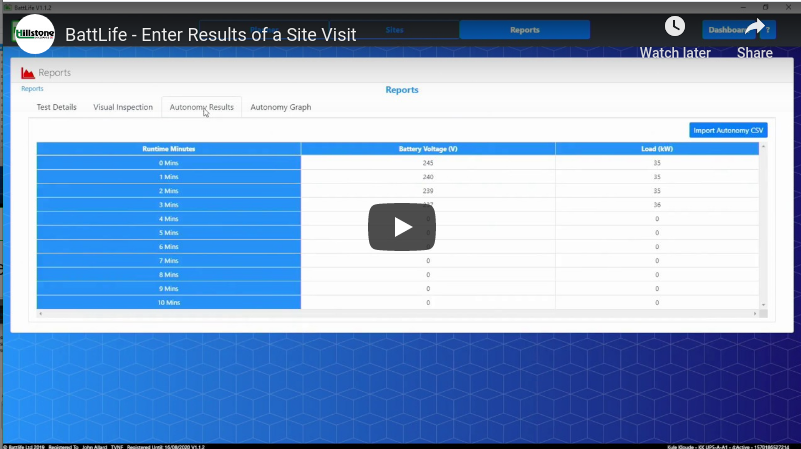
"Autonomy Table"
- "Voltage (V)" (optional)
- "Power (kW)" (optional)
-
"Conductance Table"
- "Conductance (S)" (optional)
- "Voltage (V)" (optional)
- "Temperature (C)" (optional)
-
"Impedance Table"
- "Impedance (mOhms)" (optional)
- "Voltage (V)" (optional)
- "Temperature (C)" (optional)
-
"Specific Gravity Table"
- "SG Reading (g/cm3)" (optional)
- "Temperature (C)" (optional)
Once all the required data types have been allocated click the "Confirm Import" button to import the data in to the required table. Note that not all data types are required. Importing a CSV file will overwrite the existing table.